
To replace a toilet, first, turn off the water supply, then remove the old toilet. Are you considering replacing your old toilet with a new one?
Whether you're upgrading the look of your bathroom or experiencing issues with your current toilet, knowing how to replace a toilet can save you money on hiring a professional. With the right tools and materials, you can tackle this DIY project.
In this guide, we will walk you through the step-by-step process of replacing a toilet, so you can confidently complete the task on your own. Let's dive into the essential steps and tips for a successful toilet replacement project.
Introduction To Diy Toilet Replacement
Learn how to replace a toilet with this step-by-step DIY guide. From turning off the water supply to securing the new toilet, this comprehensive tutorial has got you covered. With the right tools and instructions, you can easily tackle this project and upgrade your bathroom with a brand new toilet.
Why Consider A Diy Approach?
Embarking on a DIY toilet replacement project can be a rewarding experience. By opting for a do-it-yourself approach, you not only save money on professional fees but also gain a sense of accomplishment.
Safety Precautions Before You Start
- Ensure the water supply to the toilet is turned off.
- Wear protective gear such as gloves and safety glasses.
- Place towels or rags on the floor to absorb any water spills.
- Use caution when handling heavy parts to prevent injury.
Tools And Materials Needed
To replace a toilet, you will need tools and materials such as a wrench, screwdriver, putty knife, new wax ring, closet bolts, and a new toilet. These items will help you remove the old toilet and install the new one efficiently and effectively.
When it comes to replacing a toilet, having the right tools and materials can make all the difference in ensuring a successful and efficient installation. Here is a breakdown of the essential tools and quality materials you will need for this project.
List Of Essential Tools
- Adjustable wrench
- Screwdriver (both flathead and Phillips)
- Putty knife
- Hacksaw or PVC cutter
- Level
- Wax ring
- Closet bolts
- Toilet tank bolts
- Caulking gun
Selecting Quality Materials
When selecting materials for your toilet replacement project, it's important to choose high-quality items that will last for years to come. Here are some key materials to consider:
- Toilet: Look for a durable and water-efficient model that fits your bathroom's design and layout.
- Wax ring: Choose a wax ring that is thick and pliable, as this will help create a tight seal between the toilet and the flange.
- Closet bolts: These bolts secure the toilet to the floor and should be made of sturdy materials like brass or stainless steel.
- Toilet tank bolts: These bolts secure the tank to the bowl and should also be made of durable materials.
- Caulk: A good-quality silicone caulk will help seal the joint between the toilet and the floor, preventing leaks and water damage.
By having the right tools and materials on hand, you can replace your toilet with confidence and ensure a successful installation. Remember to follow the manufacturer's instructions carefully and take your time to avoid any mistakes or damage to your bathroom.
Preparing For The Task
Before replacing a toilet, it's important to prepare for the task to ensure a smooth and efficient process. This involves turning off the water supply, draining the toilet bowl and tank, and gathering the necessary tools and materials.
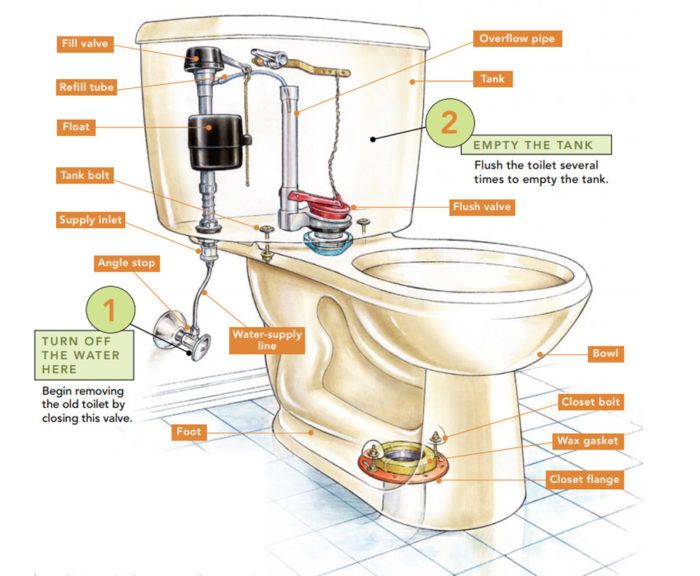
Turning Off Water Supply
Locate the shut-off valve, typically located behind the toilet, and turn it clockwise to shut off the water supply. Once the water supply is turned off, flush the toilet to drain the tank and bowl.
Draining The Toilet Bowl And Tank
To drain the remaining water in the bowl and tank, use a plunger or sponge to remove as much water as possible. It's important to ensure that the area is dry before proceeding with the removal of the toilet.
Removing The Old Toilet
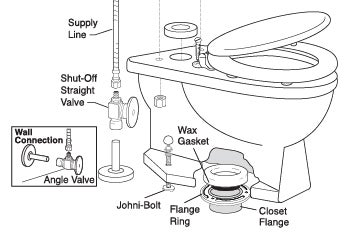
Before installing a new toilet, you need to carefully remove the old one. This process involves disconnecting the water supply line and unbolt the toilet from the floor.
Detaching The Water Supply Line
To begin, turn off the water supply to the toilet by closing the shut-off valve. Flush the toilet to drain the remaining water in the tank and bowl. Use an adjustable wrench to disconnect the water supply line from the bottom of the tank.
Unbolting And Lifting The Toilet
Next, locate the bolts securing the toilet to the floor. These are typically covered by plastic caps at the base of the toilet. Remove the caps and use a wrench to loosen and unscrew the bolts. Once the bolts are removed, carefully lift the toilet straight up to detach it from the floor flange.
Prepping The Area For New Installation
Before installing a new toilet, it's crucial to prepare the area properly to ensure a successful and long-lasting replacement. This involves cleaning the flange and checking for damage to make any necessary repairs.
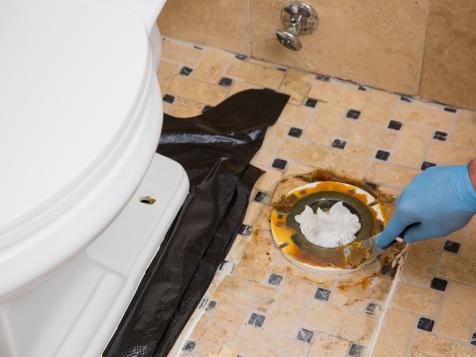
Cleaning The Flange
1. Remove the old wax ring and thoroughly clean the flange and surrounding area.
2. Inspect the flange for any debris, corrosion, or cracks that may affect the new toilet's seal.
3. Use a putty knife to scrape off any residue and ensure a smooth surface for the new installation.
Checking For Damage And Making Repairs
1. Look for any signs of water damage, such as rot or mold, around the toilet base.
2. Check the flange for stability and ensure it is securely attached to the floor.
3. If there are any damages or issues, make the necessary repairs before proceeding with the new toilet installation.
Installing The New Toilet
Once you have removed the old toilet and cleaned the flange, it's time to install the new toilet. Follow these steps carefully to ensure a proper and secure installation.
Setting The New Wax Ring
Begin by setting the new wax ring on the flange. Ensure that the wax ring is centered over the flange and firmly pressed down to create a watertight seal. The wax ring is a crucial component for preventing leaks, so make sure it is positioned properly.
Positioning The Toilet Base
Next, carefully position the toilet base over the flange, ensuring that the closet bolts align with the slots on the base. Gently press down on the base to compress the wax ring and create a secure seal. Use a level to ensure that the toilet base is perfectly aligned and balanced.
Securing The Toilet And Reconnecting Water
To secure the toilet and reconnect water after replacing it, ensure a tight fit by tightening the closet bolts, then reattach the water supply line. Test for leaks to confirm a successful installation. Following these steps will help you replace a toilet effectively.
Securing the Toilet and Reconnecting Water are the final steps in replacing a toilet. Once the toilet bowl is mounted on the flange and sealed, it's time to attach the tank and reconnect the water supply line. These steps require a bit of finesse to ensure a secure and leak-free connection. Let's take a closer look at each step.
Attaching The Tank
Attaching the tank to the bowl is a two-step process. First, place the rubber gasket onto the flush valve opening on the bottom of the tank. Then, carefully lower the tank onto the bowl, aligning the bolts on the bottom of the tank with the holes on the bowl. Hand-tighten the nuts onto the bolts, making sure the tank is level and centered on the bowl. Use a wrench to tighten the nuts until snug, being careful not to over-tighten and crack the porcelain.
Reconnecting The Water Supply Line
Before reconnecting the water supply line, inspect the old supply line for any signs of wear or damage. If it looks questionable, replace it with a new line. To reconnect the supply line, insert the threaded end of the line into the fill valve on the bottom of the tank and hand-tighten. Use pliers to tighten the nut another quarter turn. Then, attach the other end of the line to the shut-off valve on the wall and tighten with pliers. Turn the water supply valve back on and check for leaks.
In conclusion, securing the toilet and reconnecting water may seem like a daunting task, but with the proper tools and techniques, it can be done in no time. Remember to take your time and double-check all connections to ensure a leak-free installation.
Credit: www.hgtv.com
Final Steps And Leak Testing
After mounting the new toilet and attaching the tank, it's crucial to conduct a leak test. Turn on the water supply and carefully inspect for any leaks around the base and connections. This final step ensures a properly installed and sealed toilet, preventing potential water damage.
Caulking For A Finished Look
Conducting A Leak Test
In the final steps of replacing a toilet, caulking around the base not only provides a finished look but also helps prevent water damage. Use a silicone-based caulk to seal the gap between the toilet base and the floor. Apply the caulk in a continuous bead, ensuring there are no gaps. Smooth the caulk with a damp cloth for a neat finish.
After caulking, it's crucial to conduct a leak test to ensure the toilet is properly sealed. Start by filling the tank with water and allowing it to refill. Check for any leaks around the base, supply line, and tank connections. Tighten any fittings if necessary. Inspect the floor for any signs of water pooling or dampness, which could indicate a leak.
To conduct a leak test, you can also add a few drops of food coloring into the tank. Let the toilet sit for a while without flushing. If the water in the bowl changes color, it indicates a leak. Address any leaks promptly by tightening connections or recaulking as needed.
Remember, a leak-free toilet not only ensures proper functionality but also helps prevent water damage in your bathroom. By following these final steps and conducting a thorough leak test, you can complete the toilet replacement process successfully.
Common Pitfalls And How To Avoid Them
When replacing a toilet, there are certain common pitfalls that can arise if not done correctly. By being aware of these potential issues and knowing how to avoid them, you can ensure a smooth and successful toilet replacement process.
Avoiding Over-tightening
One common pitfall when replacing a toilet is over-tightening the bolts that secure the toilet to the floor. This can lead to damage of the toilet or the flange, causing leaks and instability. It's important to tighten the bolts securely, but not excessively.
Ensuring Proper Seal And Alignment
Another common issue is not ensuring a proper seal and alignment of the toilet. If the wax ring is not installed correctly or if the toilet is not aligned properly, it can result in leaks and potential water damage to the floor. Taking the time to ensure a secure seal and proper alignment is crucial for preventing future issues.
Credit: www.finehomebuilding.com
Maintenance And Care For Your New Toilet
Proper maintenance and care are essential to ensure the longevity and efficiency of your new toilet. By following these tips, you can keep your toilet in top condition for years to come.
Regular Cleaning Tips
- Use mild cleaners: Avoid harsh chemicals that can damage the toilet's surface.
- Regularly scrub: Clean the bowl and seat weekly to prevent buildup.
- Check for leaks: Inspect for any leaks or water seepage around the base.
Addressing Common Issues
- Low water level: Adjust the float to ensure proper water level in the tank.
- Phantom flushing: Replace the flapper if the toilet flushes randomly.
- Clogging: Use a plunger or plumbing snake to clear any blockages.
Remember, regular maintenance and prompt attention to issues can prevent costly repairs down the line.
Credit: www.oatey.com
Frequently Asked Questions
Can I Replace A Toilet Myself?
Yes, you can replace a toilet yourself by following step-by-step instructions provided in DIY tutorials.
Is It Difficult To Replace A Toilet?
Replacing a toilet is not a difficult task if you have the right equipment and materials ready. You need to turn off the toilet's water supply valve, drain the toilet, remove the mounting nuts, inspect the flange, test-fit the new toilet, apply the wax ring, set the toilet, and tighten the nuts.
Follow the instructions step-by-step to complete the job on your own.
Can You Replace An Old Toilet With Any New Toilet?
Yes, you can replace an old toilet with a new one, but ensure the new toilet has the same trap type and fits in the available space. Follow the step-by-step instructions for a successful DIY replacement.
How To Replace A Toilet Step By Step?
To replace a toilet: Turn off water, remove excess water, disconnect supply, remove tank, base mounts, bowl, old hardware, clean wax ring, install new toilet, bolts, seal, tank, water supply, seat, check for leaks, caulk base.
Is It Difficult To Replace A Toilet?
Replacing an old toilet with a new one doesn't have to be a difficult or daunting task. As long as you've got the right equipment and materials ready and at hand, you're all set to begin on this DIY project.
Ultimately, you'll need to follow the steps in sequence and you'll be able to complete the job on your own.
Conclusion
Replacing a toilet can be a manageable DIY project if you have the right tools and follow the steps carefully. Remember to turn off the water supply, remove the old toilet, install the new one properly, and check for leaks.
With patience and attention to detail, you can successfully replace a toilet on your own.


0 Comments