
To flush a water heater, first, turn off the heat and cold water supply, then connect a drain hose and open the drain valve to allow the water to drain completely. Flushing a water heater is essential for removing sediment and maintaining its efficiency and longevity.
Over time, mineral deposits and sediment can accumulate in the tank, reducing its heating capacity and potentially causing damage. Flushing the water heater helps to remove these deposits and ensures that it continues to operate effectively.
Regular flushing also helps to prevent issues such as strange noises, rusty water, and a decrease in hot water production. By following a few simple steps, you can easily flush your water heater and keep it in optimal working condition.
Why Flush Your Water Heater?
Flushing your water heater is crucial to remove sediment buildup, ensuring efficient performance and prolonging its lifespan. By following simple steps such as turning off the heat, connecting a drain hose, and allowing the system to fill and drain, you can easily flush your water heater and maintain its optimal function.
Regular flushing can prevent issues such as reduced hot water production and strange odors, ultimately saving you money on potential repairs.
The Benefits Of Regular Maintenance
Flushing your water heater regularly extends its lifespan and maintains efficiency. It removes sediment buildup, preventing corrosion and ensuring optimal performance.
Consequences Of Neglect
Neglecting water heater maintenance leads to sediment accumulation. This reduces heating efficiency and causes damage, potentially resulting in costly repairs.
Signs Your Water Heater Needs Attention
If you notice reduced hot water supply, strange noises, or rusty water, your water heater may need flushing. Follow these steps to flush your water heater and remove sediment buildup.
Turn off the heat, connect a drain hose, and open the drain valve to begin the flushing process. Regular maintenance can extend the life of your water heater and improve its efficiency.
Signs Your Water Heater Needs Attention
Your water heater is an essential appliance that provides hot water for your daily needs. However, like any other appliance, it needs proper maintenance to function efficiently. One way to maintain your water heater is to flush it regularly. But how do you know when your water heater needs attention? Here are some signs to look out for:
No Hot Water and What It Means
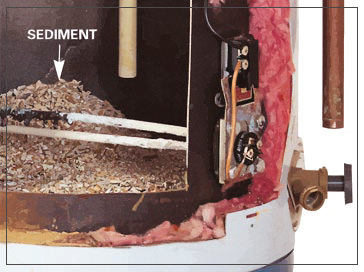
If you turn on your hot water faucet and there's no hot water, it's a clear indication that your water heater needs attention. This could be caused by a faulty heating element, a malfunctioning thermostat, or a buildup of sediment in the tank. Ignoring this sign could lead to further damage to your water heater and eventually, a complete breakdown.
Unusual Sounds and Odors
If you hear strange noises coming from your water heater, such as popping or cracking sounds, it's a sign that there's a buildup of sediment in the tank. This sediment can cause the heating element to overheat and eventually fail. Additionally, if you notice a foul odor coming from your water heater, it could be a sign of bacteria growth inside the tank.
If you observe any of these signs, it's time to give your water heater some attention. Flushing your water heater can help remove sediment buildup, prevent further damage, and extend the life of your appliance.
Safety First: Pre-flush Preparations
Before flushing your water heater, it's crucial to take some safety precautions and make the necessary preparations to ensure a smooth and hazard-free process. These steps will help you avoid potential accidents and ensure that the flushing process is effective.
Turning Off Power Sources
Before starting the flushing process, it's essential to turn off all power sources connected to the water heater to prevent any electrical mishaps. This includes shutting off the electricity and gas supply to the water heater. For electric water heaters, locate the circuit breaker and switch it off. If you have a gas water heater, turn the gas control valve to the "off" position.
Setting Up For A Safe Flush
Once the power sources are turned off, you can prepare for a safe flush by following these steps:
- Allow the water heater to cool down for a few hours before proceeding with the flushing process.
- Gather the necessary tools and equipment, including a garden hose, bucket, and gloves to protect your hands.
- Identify the drain valve on the water heater and connect the garden hose to it, ensuring a secure connection to prevent leaks.
- Place the other end of the garden hose in a suitable drainage area or connect it to a floor drain to direct the flushed water safely away from the area.
- Open a hot water faucet in your home to relieve pressure in the system and allow air to enter the water heater for a smoother draining process.
- Check the drainage area to ensure it can handle the volume of water that will be flushed from the tank.

Tools And Materials You'll Need
To flush a water heater, you'll need a drain hose, a flathead screwdriver, and a garden hose. Don't forget safety goggles and gloves for protection. Follow the steps carefully for a successful flush and improved water heater performance.
Gathering Necessary Equipment
To flush a water heater effectively, you need to gather the essential tools and materials beforehand. Here's what you'll need:
Choosing The Right Hose
When it comes to selecting a hose for flushing your water heater, ensure it is durable and long enough to reach a drain.
Before you begin the process of flushing your water heater, it's crucial to have all the necessary tools and materials ready. Here is a list of items you'll need:
- Garden hose
- Screwdriver
- Gloves
- Safety goggles
- Towels
- Bucket
- Adjustable wrench
- Vinegar (optional for cleaning)
- Water heater descaler solution (if needed)
Make sure to have all these items on hand to make the water heater flushing process smooth and efficient.
The Flushing Process Step By Step
Flushing your water heater is essential to maintain its efficiency and prolong its lifespan. Follow these steps to flush your water heater properly:
Turning Off The Heat Source
Before starting the flushing process, make sure to turn off the heat source to the water heater to prevent any accidents or damage.
Connecting And Using The Drain Hose
Next, connect a garden hose to the drain valve of the water heater and direct the other end of the hose to a suitable drainage location. This will allow you to safely drain the water heater.
Techniques For Effective Flushing
Regularly flushing your water heater is crucial for maintaining its efficiency and prolonging its lifespan. Here are some effective techniques for flushing your water heater to remove sediment and improve its performance.
Allowing Air Into The System
Before starting the flushing process, it’s essential to allow air into the water heater system. Begin by turning off the heat and cold water supply to the heater. Then, connect a drain hose to the heater and open a hot water faucet in your home to allow air to enter the system.
Opening The Drain Valve
After allowing air into the system, locate the drain valve on the water heater and open it to begin the flushing process. Connect a garden hose to the drain valve and ensure the other end of the hose leads to a suitable drainage area. Once the hose is securely attached, open the drain valve to allow the sediment-laden water to flow out of the heater.
Post-flush Procedures
To properly flush a water heater, start by turning off the heat and cold water supply, then connect a drain hose and open the drain valve. Allow air into the system and inspect the draining water. Flush in bursts and inspect the water again before completing the process.
Post-Flush Procedures:
Once you have completed the flushing process, it is important to follow some post-flush procedures to ensure that your water heater functions properly and lasts for a long time. In this section, we will cover some important steps that you need to take after flushing your water heater.
Inspecting Drained Water:
After you have drained all the water from your water heater, it is important to inspect the drained water. If you notice any sediment or debris in the drained water, it is an indication that your water heater tank has significant buildup. In such a case, it is important to repeat the flushing process until the drained water is clear.
Filling and Draining for a Complete Flush:
After you have inspected the drained water, it is important to fill the water heater tank completely and drain it again for a complete flush. This step helps to ensure that all the sediment and debris have been removed from the tank.
To do this, close the drain valve and turn on the cold water supply to your water heater. Once the tank is full, open the drain valve again and allow all the water to drain out. Repeat this process until the drained water is clear.
Other Post-Flush Procedures:
After completing the above steps, you can turn on the gas or electricity supply to your water heater and relight the pilot light. It is also important to check the pressure relief valve and make sure it is functioning properly.
In addition, it is recommended to schedule regular maintenance for your water heater to ensure it continues to function efficiently. This includes checking the anode rod, which helps to prevent corrosion inside the tank.
Conclusion:
Flushing your water heater is an important maintenance task that helps to ensure its longevity and efficiency. By following the post-flush procedures discussed above, you can ensure that your water heater functions properly and lasts for a long time. Remember to schedule regular maintenance for your water heater to keep it functioning at its best.
:max_bytes(150000):strip_icc()/how-to-drain-a-water-heater-2719055-hero-35f0548b0f1f42f0b13ba96a33ab8da2.jpg)
Restarting Your Water Heater
To flush your water heater, first turn off the heat and cold water supply, then connect a drain hose. Open the drain valve and allow the water to drain completely. Finally, refill and drain the tank once more for a thorough clean.
Final Fill And Checks
After flushing, ensure all valves are closed and the tank is completely empty.
Relighting The Pilot (for Gas Heaters)
Follow manufacturer's instructions to relight the pilot, ensuring a steady flame.
Maintaining Water Heater Post-flush
After flushing your water heater, it's crucial to perform routine maintenance to ensure its continued efficiency and longevity. By conducting regular checks and maintaining a proper balance, you can avoid potential issues and extend the lifespan of your water heater.
Routine Checks And Balancing
Regularly inspect your water heater for any signs of leakage, corrosion, or unusual noises. Additionally, test the pressure relief valve and ensure that it's functioning correctly. It's also important to maintain a balanced temperature setting to prevent overheating or underperformance.
When To Seek Professional Help
If you encounter persistent issues such as leaks, insufficient hot water, or strange odors, it's advisable to seek professional assistance. A certified technician can diagnose and address any underlying problems, ensuring the optimal performance of your water heater.
Faqs And Troubleshooting
Learn how to flush a water heater to remove sediment with these easy steps. Turn off the heat and cold water supply, connect a drain hose, and allow air into the system before opening the drain valve. Inspect the draining water and flush in bursts, before inspecting the water again and completely filling and draining the tank once more.
Finish by filling the tank and following the final steps.
Addressing Common Issues
If you encounter issues while flushing your water heater, don’t panic. Here are some common problems and solutions:
- Water not draining: Ensure the drain valve is fully open and the hose is not kinked.
- Low water pressure: Check for any blockages in the pipes or valve.
- Strange noises: Sediment buildup might be causing the noise; consider a more thorough flush.
Tips For Diy Flush Success
For a successful DIY water heater flush, keep these tips in mind:
- Turn off the power: Safety first - switch off the power supply to the water heater.
- Prepare the area: Place a bucket under the drain valve to collect sediment and water.
- Use a hose: Connect a garden hose to the drain valve for easy water disposal.
- Flush in bursts: Open and close the valve in intervals to dislodge stubborn sediment.
- Inspect the water: Check the water clarity to determine if further flushing is needed.
Frequently Asked Questions
Can I Flush My Water Heater Myself?
Yes, you can flush your water heater yourself by following simple steps to remove sediment buildup. Turn off the heat and cold water supply, connect a drain hose, open the drain valve, and flush in bursts until the water runs clear.
It's an easy DIY process.
How Do You Flush Sediment Out Of A Water Heater?
To flush sediment out of a water heater, follow these steps: 1. Turn off power and hot water faucet. 2. Shut off cold-water valve. 3. Attach hose and drain tank. 4. Begin draining and flush system. 5. Repeat if needed for clean water.
How Do I Know If My Water Heater Needs To Be Flushed?
To know if your water heater needs flushing, watch for signs like no hot water, funny smells, strange noises, or rust-colored water.
Is A Water Heater Flush Necessary?
Yes, a water heater flush is necessary for maintaining efficiency and preventing sediment buildup. Regular flushing prolongs the heater's lifespan.
Why Is It Important To Flush A Water Heater?
Flushing a water heater is important to remove sediment buildup, maintain efficiency, and extend the lifespan of the unit.
Conclusion
Flushing your water heater regularly is crucial for its efficiency and longevity. By following simple steps like draining, flushing, and refilling, you can prevent sediment buildup and ensure optimal performance. Remember, a well-maintained water heater saves you money in the long run. Keep your water heater running smoothly!


0 Comments